

 After my adventures in Pavlova transport earlier this year, I decided it would probably be a good idea to make something just a bit less fragile for Rosh Hashanah dinner.
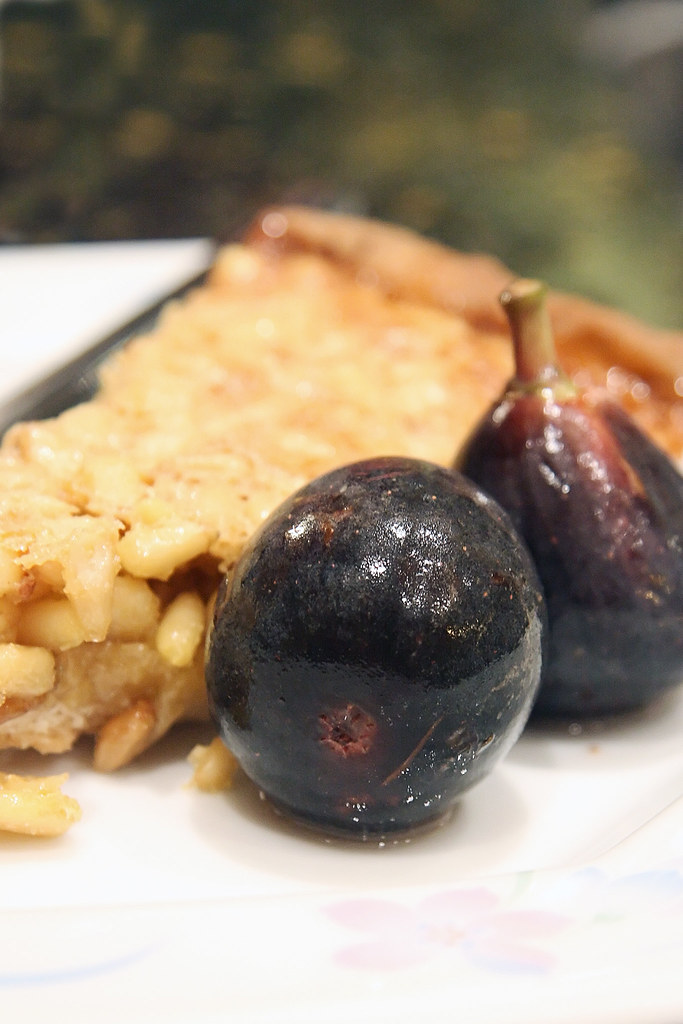
Enter this golden-brown pine nut tart that's the perfect blend of symbolism, sturdiness and deliciousness. You can serve it on its own, or you can pair it up with gently poached fresh figs in a honey-spice syrup like we did... either way, it's pretty much guaranteed to satisfy your honey quota and then some.
And speaking of honey - do make sure you use the most flavourful honey you can get your hands on. A delicate honey like your basic supermarket white clover will just fade into the background, while a more assertive variety like orange blossom or acacia will ensure you get a nice distinctive honey flavour in your finished tart. (I used a combination of thyme and buckwheat for mine)
And while I can't promise this dessert will bring you a sweet new year, it'll definitely bring you a sweet new year's dinner. :)
A few other notes:
You can make this dessert using butter-flavoured vegetable shortening if you don't want to serve meat and dairy in the same meal (which is what I did for Rosh Hashanah) - however, if you're not limited by similar restrictions, please do use butter... it really does make for a better end product.
Lastly, if it's not a special occasion, you may find this amount of pine nuts might be a little cost prohibitive. Go ahead and replace some (or all) of the pine nuts with something else... walnuts, pistachios or cashews would all be wonderful choices.
//
Honey and Pine Nut Tart
Crust
2 ½ cups flour
⅓ cup sugar
¾ tsp salt
½ tsp baking powder
Zest of 1 lemon
¾ cup cold butter, cut into cubes
2 eggs
½ tsp vanilla extract
¼ cup orange juice
Filling
½ cup butter, softened
½ cup sugar
3 eggs
¾ cup honey
½ tsp vanilla extract
¼ tsp salt
Juice and zest of 1 lemon
2 cups pine nuts
To make the crust, combine flour, sugar, salt, baking powder and lemon zest in the bowl of a food processor; pulse two or three times to blend. Add in butter, and pulse until mixture resembles coarse meal. Add the remaining ingredients, pulsing just until the dough comes together - if necessary, add some more orange juice (one or two tablespoons at a time), until the dough forms. Turn out onto a clean surface and work with your hands until the dough is soft and pliable.
Note: If you do not have a food processor, cut the butter into the flour mixture using a pastry cutter or two knives instead, then add liquid and use hands to combine into a workable dough.
Split the dough into two equally sized balls. Flatten each ball into a disc, then wrap tightly with plastic wrap and chill in the refrigerator for at least an hour to firm up.
When you're ready to bake, preheat the oven to 350F.
Unwrap one of the dough discs and place on a generously floured surface (the other disc can be put in the freezer to use another day - it'll keep for up to three months in there). Using a rolling pin, roll out into a 12" circle. Fit the dough into a 10-inch round tart pan with a removable bottom, pressing gently into corners and sides. Trim any excess dough off the edges using a sharp knife. Poke the crust a few times with a fork, then line with foil and fill with dried beans or pie weights. Chill for 10 minutes.
Bake in preheated 350F oven for 10 minutes, or until just starting to brown. Remove from oven, lift out the foil and set aside to cool.
Meanwhile, make the filling. Start by creaming together the butter and sugar until light and fluffy. Add in the eggs, one at a time, stirring until the mixture is evenly combined. Stir in the remaining ingredients, and pour into the prepared crust.
Bake tart at 350F for 40-45 minutes, or until the filling is set and golden-brown (it's okay if it's slightly wobbly in the middle). Make sure to check on the tart periodically as it bakes - if it begins to brown too quickly, shield it with a tented piece of foil, being careful not to disturb the filling.
Serve warm or at room temperature with a dusting of icing sugar and/or poached figs in honey-spice syrup.
//
Poached Figs in Honey-Spice Syrup
10 small ripe black figs
¼ cup honey
⅔ cup water
⅓ cup red wine (or martini rosso, if you have it)
1 tsp fennel seed
2 strips lemon peel
3 cloves
Using a fork, poke a few holes into the figs to allow the syrup to soak in. Place in a heat-proof bowl and set aside.
In a small saucepan, combine remaining ingredients; bring to a simmer over medium heat, stirring frequently, then remove from heat and allow to steep for five minutes.
Pour warm syrup over figs. Let sit at room temperature for an hour or two before serving to allow the figs to absorb the flavour of the syrup.
Leave a Reply